Growing Cabbage for Home Grown
Super Scrumptious Crops

Growing cabbage successfully every time results in amazing harvests. Plant them all year through - if that's what you want. By choosing cabbage of the right varieties, have enough land, and sow/transplant at the correct times... a non-stop harvest can be yours.
Remember to note that when following the instructions below on planting cabbages - the terms spring, summer and winter refer to the season that the cabbage is harvested in.
Most of us though, tend to be more selective about which cabbage we want to plant in our vegetable garden or when we want to harvest them. I like to sow cabbage seed in the autumn so I can lift them in the spring and enjoy fresh vegetables at a time when there may be few about.
Or, I like growing cabbage varieties which I can sow in the spring so my wife Ros can make her delicious coleslaw or grate some into a salad during the summer and, of course, continue having it with your Sunday roast, I still love my Sunday roast... talk about tradition, my children would riot if they didn't get one when they visited.
Growing cabbage can still suffer undeservedly from its past reputation. Older generations may still remember the terrible taste and smell of winter cabbages, savoys and those tough spring greens which haunted their childhood.
But over the past thirty years there have been remarkable improvements with cabbages as the newer varieties are more delicate in flavour. In the case of modern cabbage plant flavours - less is indeed more. But even if you still find cabbage overpowering you can grow the mild Chinese cabbage varieties... a definite entry into your - 'Growing Cabbage' - note book.
Examples Of Cabbage Varieties
 Savoy Cabbage
 Chinese Cabbage
 Red Cabbage
You will find a host of these newer varieties in the many seed catalogues that you can have delivered to your door free... make sure you take advantage of some of them.
They hold lots of tips and instructions on growing cabbage and planting specific vegetable types and varieties, you will find them very useful.
Most of the cabbage varieties will fall neatly into one of the three major groups - spring, summer or winter.
Growing Cabbage - Soil Details
Cabbages do best in a reasonably firm soil, so leave it for several months between digging and planting. Like all brassica varieties dig in plenty of well rotted manure or compost in the autumn - don't dig in the manure close to planting time. If the soil is acid then apply lime during the preparation, acid soil discourages growth and encourages that dreaded affliction of brassicas, club root... aim at pH 6.5 - 7.0.
Pick a reasonably sunny spot for the site where you are growing cabbages. If you can, use a site where peas and beans (Legumes) where grown the previous year, if you dug in manure or compost for them then no more is required.

If you didn't, then feed the soil as described above. Don't dig up those pea and bean roots as they contain lots of usefull nitrogen that plants require.
About a week before planting apply a general fertiliser like Growmore. Don't apply it when growing cabbage like spring cabbages though, as this variety needs to be grown slowly in a sheltered spot... remember these cabbages are growing through the winter.
If cabbage root fly is a problem (see photo left) use protective discs around the base of the plants so the flies can't lay their eggs - purchase them from garden centers or make your own from roofing felt, old carpet or underlay... use your imagination.
Don't fork over the surface before planting. Tread the soil down gently then rake over and remove any surface rubbish.
Making A Seed Bed
In early spring rake over and level the area you have chosen as a seed bed - frosts will have done a lot of the work for you by then... hopefully. If you only require a few plants then this need not be too big an area.
Cover the bed with sifted mature compost if you have some - the bed may be small enough to purchase a bag or two from your garden centre, especially if you're just beginning your adventure in growing cabbage, you might not have the organic matter to compost.
Firm the bed by tamping the surface with the back of your rake... but only when the soil is dry enough i.e. not sticking to your boots. Then give it a light raking over.

These spring cabbage were planted in October, photo taken in February and the cabbages will be ready in a few weeks. I will further thin them out and my wife will use the thinnings as 'greens' - they will be delicious.
Mark out the rows using string stretched between two stakes for a straight line and make shallow drills along the length of the string with a trowel or the edge of a hoe 13mm(1/2") deep and rows 15cm(6") apart.
Sow the seed thinly into the drills and cover them over with soil, lightly firming with the back of the rake. Mark both ends of the row, labelling one end with the variety and date of sowing. Keep the seed bed moist, always use a fine spray.
When the cabbage plants are about 2.5cm(1") tall, thin the seedlings to about 7.5cm(3") apart in the rows. This is to stop overcrowding thus causing the seedlings to become weak and spindly.
The seedlings are ready to plant out when they are about 10cm(4") to 15cm(6") tall. Water the bed the previous day before removing them to their permanent position.
When growing cabbage there is no need to remember which varieties to grow: spring, summer or winter etc. Part of the enjoyment of growing vegetables is to get hold of some of those amazing seed catalogues (they're sent out free by seed companies - up to now, see NB. above) and get to know what is available - then make your choice... especially around a nice cosy fire. The anticipation really energises you for the coming spring.
Sowing Seed Into Trays

As ever, when growing cabbage or any vegetable, there are other ways to achieve the same outcome. So if you have a greenhouse, cold frame or cloches - growing cabbage from seed can be made easier and more convenient if you don't have a large garden to accommodate a seed bed.
Sow cabbage seed in a tray filled with seed compost bought from your local gardening centre. Water thoroughly and place them inside one of the above (cloche etc...). When the first two leaves have formed prick them out into 7.5cm(3") pots filled with potting compost.
Plant them into these pots a little deeper - to just below the two leaves - water in well. Leave plants to grow on until tall enough for planting out by following the growing instructions above.
For a more detailed description of how to sow seed into trays click here - Starting Vegetable Seeds - This will open the web page into a new window then scroll half way down the page.
Planting Out
The place you have chosen as your permanent bed for growing cabbage can be in full sun or partial shade, but partial shade is better. Water your plants the day before you aim to transplant them into that well-firmed bed you prepared last autumn.
Transplant the cabbage plants in the evening to minimise distress and to make a quicker recovery - keep as much soil around the roots as you can.

Use two stakes with string stretched between them like you did on the seed bed, to mark out a straight line. Make a hole with a trowel or dibber large enough to take the root ball. Plant the seedlings to just below the two lowest leaves.
If you're new to growing cabbage and you want to be a bit geeky, these first leaves are called cotyledons or 'seed leaves'.
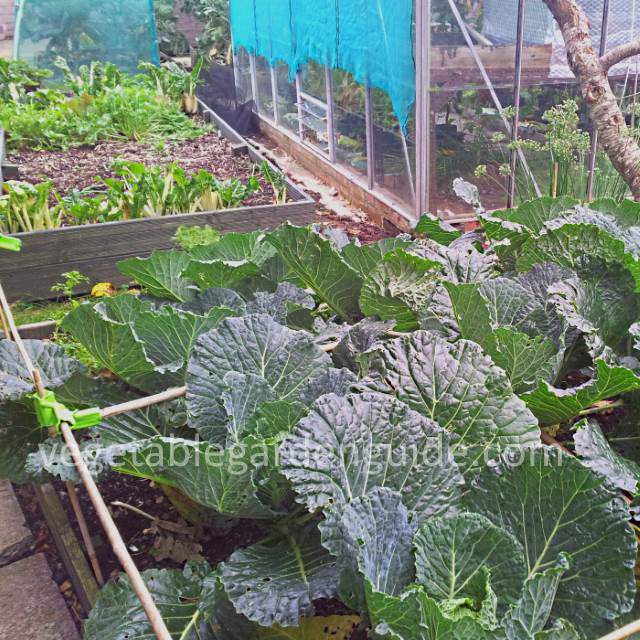
Firm the soil around each plant with your hands or the dibber. Remember - firm planting helps to grow firm, tight heads. The picture on the left shows spring cabbage seedlings growing in the border of my greenhouse.
The seedlings are ready for transplanting when they have 5 or 6 leaves. Water the rows the day before you move the transplants to the prepared permanent bed.
Allow 30cm(12") between plants if the variety is compact and 45cm(18") either way if the variety forms large heads. With spring cabbage plant 10cm(4") apart and use the thinnings in March as spring greens - they will be delicious.
Note Well... an important point to remember when growing cabbage is that transplanting is necessary. Planting out seedlings from pots or seed beds encourages a stronger root system to be established in their permanent bed.
Caring for Your Plants
Hoe regularly to keep down weeds but don't loosen the soil to deeply - a firm bed... remember. Earth up around the plant stems of spring cabbage and firm the soil down to help support them.
Water your cabbage plants in dry weather especially if you have a prolonged dry spell - a properly prepared bed will help retain moisture.
One major enemy of your attempt to grow vegetables are birds - especially in country gardens, they particularly seem to like brassica plants. Protect the smaller plants from sparrows and the bigger mature plants from wood pigeons.
Apply a foliar feed during summer as the plants respond very well to this. Far more nutrients are absorbed than by feeding at the roots.
Two other menaces that can have a bad impact on your plants are caterpillars and aphids. See ways of dealing with these pests below under 'Pest Control'.
Pest Control
|
|
|
|
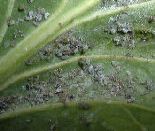
Mealy Aphids are a serious pest when growing cabbage - they will weaken the plants and introduce viruses which further weaken the plants. Spray with Derris if infestation is serious.
|
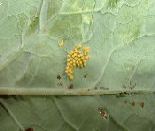
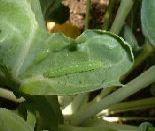
Eggs of the Large White butterfly. Caterpillars can defoliate a plant quickly so watch out
for them. Inspect the underside of the leaves for clusters and squish them. Practice
your tennis strokes when the butterfly is about.
|
Caterpillar of the Small White butterfly. Defoliates plants quickly, watch out for them. Pick off and destroy, use a nematode spray or spray with Derris. Eggs are laid under leaves in a random way, not in clusters, nor are they brightly coloured. |
Growing cabbage to minimise pest problems will mean following some sort of crop rotation plan. This simply means not growing vegetables of the same family in the same piece of earth year after year...it encourages pest build up in the soil.
For cabbages this means - Broccoli, Brussels Sprouts, Kohl Rabi, Turnip, Cauliflower. Whether you are a seasoned vegetable grower or are just growing cabbages or any vegetable for the first time - pests and diseases don't care... so get to know your enemy.
Cabbage Root Fly...
can be a problem so use protective discs (see photo above under 'Soil Details') at the base of the growing cabbage plants - they lay their eggs in the soil at this point.
These can be made from old bits of hessian backed carpet, underlay or roofing felt - use your imagination. Also cover with gardening fleece when the plants are young. Fleece is a great friend to the gardener, it allows rain and light through but insulates against frost and deters pests.
Caterpillars...
left unattended will devastate your growing cabbage plants. They feed on the underside of the leaves and the best answer is to just pick them off and... squish 'em. They also lay their eggs there too so look for yellow clusters aannndddd... squish 'em.
If you you haven't the time to keep squishing - or the stomach (sorry but this is all part of growing cabbage), then use 'Just Caterpillar'. It uses nematodes to provide an environmentally safe and efficient treatment which can be watered straight onto edible plants. Use 'Just Caterpillar' once they are seen on the plant, preferably whilst they are still small, and the nematodes will quickly seek out the caterpillar and kill it. Get it from your garden centre.
Spraying with Derris will also have an impact.
Club Root...
is a fungus and all brassicas (that's the family umbrella for cabbages along with broccoli, brussels sprouts, kohlrabi, turnip, cauliflower) can be affected.
The roots become stubby and swollen. Leaves become yellow and wilt causing severe stunting of growth. This causes swelling and reduces the flow of water and nutrients to the plant. Spores are produced and can survive in the soil for up to five years.
Prevent club root by practicing crop rotation and take extreme care if you buy in seedlings from outside as this is often the way this fungus is introduced.
Reducing the acidity of the soil by adding lime will help.
Aphids...

can be a serious pest by weakening your cabbage plants and introducing viruses. Try planting Marigolds or Tagetes plants among the crop. They attract beneficial insects like hover flies and lady birds which feed on the aphids and will help reduce the infestation - yet another aspect of growing cabbage and other garden vegetables is to understand how nature can be used to benefit your environment.
Spraying is the only way to have a real impact on badly infested plants. Spray with Derris, an organic compound recommended by organic growers.
Major changes have taken place in the UK and Europe concerning the availability of pesticides during recent years. Visit your garden centre or nursery and seek their advice as what to use.
Flea Beatles...
are tiny beetles that can make sieves out of your brassica leaves. When you touch the cabbage leaves they ping off just like regular fleas, only these won't bite you! To deter them:
- Use horticultural fleece placed over your cabbage, as soon as you transplant them outside; a floating row cover.
- Lightly hoe over the soil regularly to destroy eggs and larvae and expose them to predators.
- Give your plants a midday shower with the hose (not in full sun though), as they're most active then and they don't like wet conditions.
- Try 'Companion Planting', to attract the beneficial insects.
Harvesting
Come March, thin out the spring cabbage and use the thinnings as spring greens. Leave the rest to heart up for cutting in April/May.

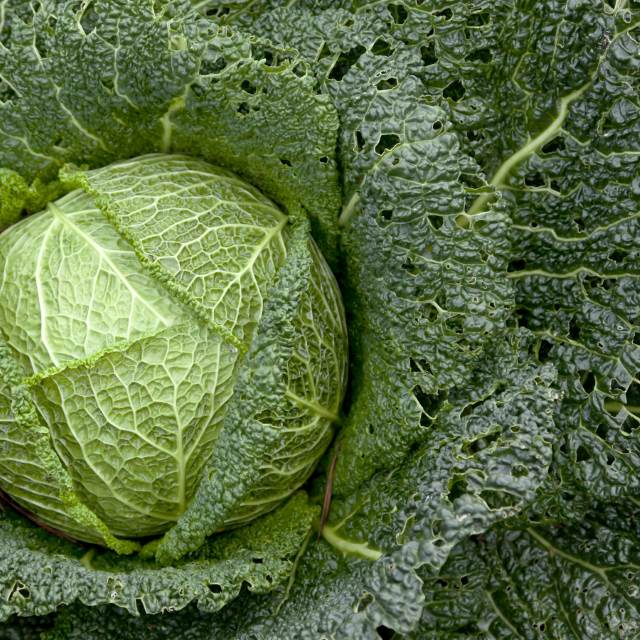
The photo of the cabbage below is of my first summer cabbage (Primo) of 2006. Doesn't it look mouth watering - crisp and clean. You only have to grow one to enjoy a taste of paradise.
Harvest cabbages by cutting with a sharp knife close to ground level. A quick tip when growing spring and summer cabbage - cut a 13mm(1/2") deep cross in the top of the stump and a secondary crop of small cabbages will grow from the cut surface.
Cabbages are mainly cut as required for immediate use. But both red and winter white cabbages can be cut in November and stored for later use. The roots and stem are trimmed off and outer leaves removed. Put them in boxes lined with straw and place them in a cool dry place - you should be able to cook these until March.


Home | Contact Us | Starting Seeds | Raised Garden Beds| Questions With Answers |
List of Veggies | Container Growing | Garden Compost | Privacy Policy
Copyright© 2022 - www.vegetable-garden-guide.com - All Rights Reserved.